ORB-SLAM2 Installation Guide
Preface
This blog will describe in detail how I installed Ubuntu16.04 dual system in bare metal state and installed the corresponding version of ROSkinetic system. In addition, after installing these two systems, how to successfully install and debug INDEMIND binocular camera and implement ORB-SLAM2 algorithm.
This article is my work notes of laboratory work during undergraduate period, officially recorded in January 2020, and now recorded on this blog site.
Hardware preparation
I use DELL-inspirion 5488, which is equipped with 3.0 USB interface for the camera.
Please do not lower than this configuration during the installation process, so as to avoid the algorithm cannot be executed after installation.
The whole installation process includes the following major links. If you have already installed some modules, you can skip this part.
Install Ubuntu16.04
IDEMIND binocular camera can match Ubuntu18.04 and Ubuntu16.04 versions of Ubuntu, but it is best to use Ubuntu16.04 version.
Because I installed it too many times, I forgot to take screenshots. For detailed process, please refer to this article: Install Ubuntu 16.04 desktop
Install ROS
References
About the version
During the installation process, please pay attention to the ROS version, which must match your Ubuntu version. Ubuntu16.04 corresponds to The ROS version is kinetic. If you don't know which version of ROS your Ubuntu corresponds to, you can search Baidu.
Friends with the ability can go directly to the ROS kinetic official website and follow the official installation guide. Most of the installation processes on the Internet are translated from the official website. And the official website can guarantee that the latest key is used.
Be sure to use a stable network during the installation process! Most of the errors are caused by unstable network.
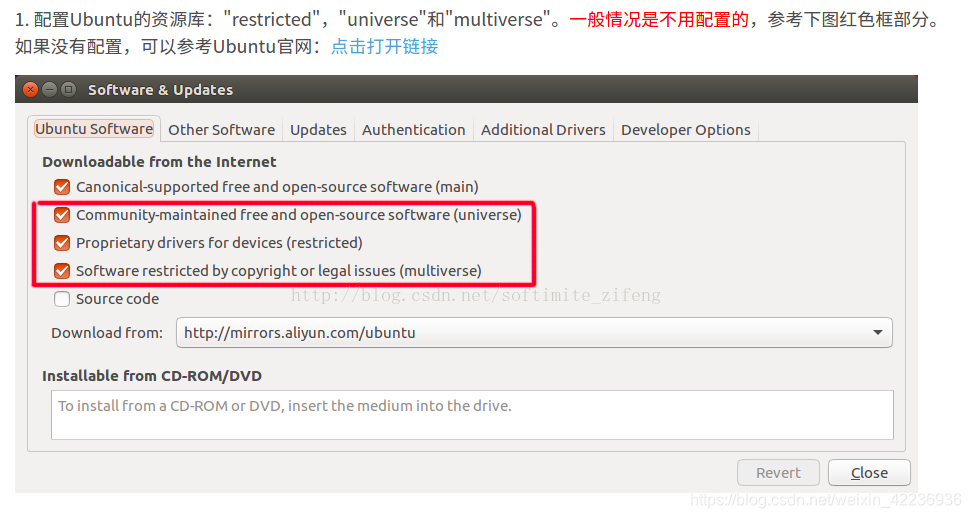
Configure Ubuntu's resource library. ( Optional )

Ubuntu resource library configuration Tips
If you are in China, the URL of
Download fromis most effective when using Alibaba Cloud's link.http://mirrors.aliyun.com/ubuntuSet Ubuntu's
sources.list.sudo sh -c 'echo "deb http://packages.ros.org/ros/Ubuntu $ ( lsb_release -sc ) main" > /etc/apt/sources.list.d/ros-latest.list'Set key.
sudo apt-key adv --keyserver hkp://ha.pool.sks-keyservers.net:80 --recv-key 421C365BD9FF1F717815A3895523BAEEB01FA116Tips
If you cannot connect to the above server, you can try to replace keyserver with
hkp://pgp.mit.edu:80orhkp://keyserver.Ubuntu.com:80.Update package.
sudo apt-get updateInstall ROS kinetic Full version.
sudo apt-get install ros-kinetic-desktop-fullTips
After installation, you can view the available packages through the following command:
apt-cache search ros-kineticInitialize rosdep.
Before using ROS, you must initialize it, use the following command:
sudo rosdep init
rosdep update
Configure the environment.
echo "source /opt/ros/kinetic/setup.bash" >> ~/.bashrc
source ~/.bashrc
Among them:
sourc ~/.bashrcis the code to update the configuration file. This command must be executed every time the bash file is changed to take effect.Install the dependencies of the building package.
sudo apt-get install python-rosinstall python-rosinstall-generator python-wstool build-essentialTest that ROS is installed successfully.
- Open Termial and enter the following command to initialize the ROS environment:
roscore- Open a new Termial and enter the following command to pop up a small turtle window:
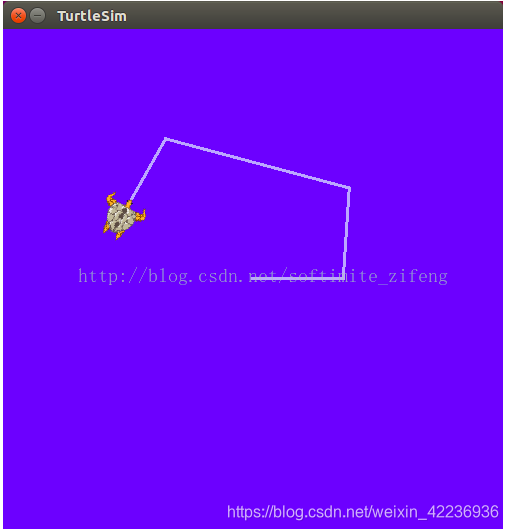
rosrun turtlesim turtlesim_node- Open a new Termial and enter the following command to control the movement of the turtle with the arrow keys in Termial:
rosrun turtlesim turtle_teleop_key
turtlesim runs successfully - Open a new Termial and enter the following command to pop up a new window to view the ROS node information:
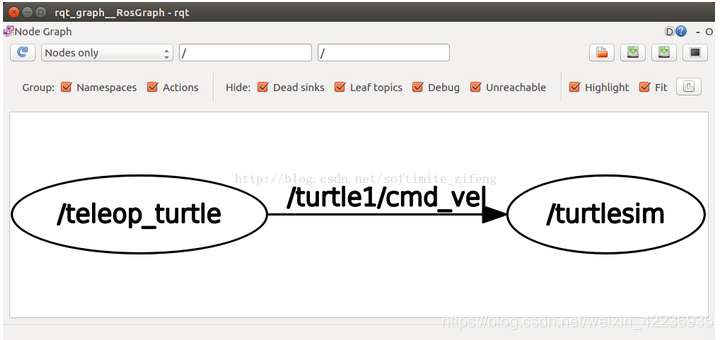
rosrun rqt_graph rqt_graph
ROS node information
Install The ORB-SLAM Algorithm In INDEMIND
The following process is mostly a record of the installation operation process under the Ubuntu18.04 version. The second installation of the Ubuntu16.04 version is slightly different. The differences are reflected in the form of annotations, and there is no screenshot record.
The algorithm for installing this camera is divided into the following main steps:
- [Configure the environment](/article/2iezf70h/#Configure the environment)
- [Install the SDK dependent environment](/article/2iezf70h/#Install the SDK dependent environment)
- [Install the SDK](/article/2iezf70h/#Install the SDK)
Configure The Environment
Install Pangolin
Before installing Pangolin, make sure the following environments have been installed correctly.
- Glew
sudo apt-get install libglew-dev- CMake
sudo apt-get install cmake- Boost
sudo apt-get install libboost-dev libboost-thread-dev libboost-filesystem-dev- Python
Ubuntu16.04 and 18.04 come with Python2, no need to reinstall.
After ensuring that the above prerequisites are installed, execute the following command to install Pangolin.
git clone https://github.com/stevenlovegrove/pangolin.git
cd pangolin
mkdir build
cd build
cmake -DCPP11_NO_BOOST=1 ..
make -j
Problems that may be encountered during installation
- Network problems. Be sure to pay attention to network problems during installation! If possible, try to use hotspots.
If the error reported in the middle is not an error like 'XXX package not found', it is mostly caused by unstable network. Re-execute the failed command multiple times to succeed. 2. Package Not Found problem.
Just follow the prompts to install the corresponding package. Note that after the installation package is completed, re-execute the following two lines of code to take effect:
cmake -DCPP11_NO_BOOST=1 ..
make -j
Problems I encountered.
ERROR 1: libpng12-dev installation failed. When executing
sudo apt-get install libjpeg-dev libpng12-dev libtiff5-dev libopenexr-dev:E: Package 'libpng12-dev' has no installation candidateSolution
This error is because libpng12-dev has been discarded after Ubuntu16.04 and needs to be replaced with libpng-dev.
sudo apt-get install libjpeg-dev libpng-dev libtiff5-dev libopenexr-devERROR 2: xkbcommon not found.

xkbcommon not found Solution
sudo apt-get install libxkbcommon-dev
Install OpenCV3.4.3
About the installed version
Opencv must be installed with version 3.4.3, otherwise INDEMIND will not run. Although this article is an installation tutorial for 18.04, it is also completely fine for 16.04.
Install cmake and other dependencies.
sudo apt-get update
sudo apt-get install cmake
sudo apt-get install build-essential libgtk2.0-dev libavcodec-dev libavformat-dev libjpeg.dev libtiff4.dev libswscale-dev libjasper-dev
Download the corresponding version from the opencv official website: https://opencv.org/releases/.
After downloading, unzip the file.
Enter the unzipped folder and create a
buildfolder, and enterbuild.mkdir build cd buildcmake.
cmake -D CMAKE_BUILD_TYPE=Release -D CMAKE_INSTALL_PREFIX=/usr/local ..Compile.
sudo makeExecute the installation command.
sudo make installConfigure the environment.
sudo gedit /etc/ld.so.conf.d/opencv.confAdd to the blank document that opens:
/usr/local/libThen execute to make the changes take effect:
sudo ldconfigConfigure bash.
sudo gedit /etc/bash.bashrcAdd to the end of the open file:
PKG_CONFIG_PATH=$PKG_CONFIG_PATH:/usr/local/lib/pkgconfig export PKG_CONFIG_PATHThen execute the following command to update:
source /etc/bash.bashrc sudo updatedbConfiguration completed!
Test.
Enter
opencv-3.4.3/samples/cpp/example_cmake, which contains some official cmake programs, and execute the camera program:cmake . make ./opencv_exampleIf you can call your computer's camera, it means the installation is successful!
Install Eigen3
sudo apt-get install libeigen3-devInstall DBoW2
When installing DBoW2, you need OpenCV support.
git clone https://github.com/dorian3d/DBoW2
cd DBow2
mkdir build
cd build
cmake ..
make
sudo make installInstall g2o.
References
Download the compressed package from the official website .
Install dependencies.
sudo apt-get install cmake libeigen3-dev libsuitesparse-dev qtdeclarative5-dev qt5-qmake libqglviewer-devIt may happen that
linqglviewer-devcannot be installed. If you do not need the viewer module of g2o, you do not need to install this dependency. If you need it, you can download it directly from the official website, and then execute the following command to install it separately:mkdir build cd build cmake … make sudo make installCompile.
mkidr build
cd build
cmake ..
make
Install.
sudo make install
Install SDK dependencies
Install google-glog and gflags.
sudo apt-get install libgoogle-glog-devInstall BLAS&LAPACK.
sudo apt-get install libatlas-base-devInstall SuiteSparse and CXSparse.
sudo apt-get install libsuitesparse-dev
Install SDK
Important
Ubuntu16.04 must be compiled with GCC5.4, otherwise the link may fail.
References
- ROS SDK installation .
- ORB-SLAM tutorial on INDEMIND WeChat official account.
1. Download SDK and source code
SDK: https://github.com/INDEMIND/SDK-Linux
ORB-SLAM: https://github.com/INDEMINDtech/run.ORB
2. Install SDK
After downloading SDK, go to
SDK-Linux/demo_ros/srcdirectory. Put the downloaded ORB-SLAM2 in this directory.Replace
CMakeList.txtto the...SDK/demo_ros/srcdirectory.Enter the
sdk/demo_ros/src/ORB_SLAM2/Vocabularydirectory and execute:tar -xf ORBvoc.txt.tar.gzOpen the terminal in the
demo_rosfolder of the Linux SDK and use the command to compile:catkin_makeAfter successful execution, two executable files will be generated under the
demo_rosfolder:- module_driver
- stereo_euroc
Open a new terminal and execute:
roscoreCopy
module_drivertoSDK/lib/1604, open the terminal and execute:sudo -s sudo chmod 777 ./run.sh ./run.shEnter the
SDK/demo_rosdirectory, open the terminal, and execute:./stereo_euroc
Summary
: tada: : tada: When you complete all the above steps, you should be able to get a real-time ORM-SLAM algorithm : tada: : tada:
Contributors
Changelog
6bcf2-fix(docs): format issueson941fa-feat(theme): upgrade and use collectionsoneb6eb-improve(docs): use pangu formatteroned3ef-improve(docs): add tags and fix text typoonfea7c-improve(docs): delete extra whitespace and blank linesonc11b4-fix(docs): optimize articleson3bbf0-feat(docs): add a new english articleon
Copyright
Copyright Ownership:dingyuqi
License under:Attribution-NonCommercial-NoDerivatives 4.0 International (CC-BY-NC-ND-4.0)